TECNIDEA CIDUE has created a range of automatic and manual products for tensioning the return shafts of chain, carpet, belt, net, conveyors etc.
These solutions can help designers eliminate elaborate and costly systems by replacing them with off-the-shelf booster sets. In particular, these items are made from a design development of the elastic spring elements: TEN BLOC and ASSO. Both of these two evolutions are in turn splitted into two other categories: AUTOMATIC (with spring) and MANUAL. The TEN BLOC automatic groups, in this section, are named: DECA (elastic element with internal spring), DECA Pr (elastic element with internal spring and preload system) and DECA Un (unidirectional elastic element with internal spring but with movement only pushing).
The TEN BLOC manual units in this section are called GRT. ASSO automatic or manual transmission units offer innumerable assembly choices and are classified with the following abbreviations: GRAF - GRAL - GRF - GRL - GRS.
The tensioners TEN BLOC type TBB force the column to move in only one direction, that is the one of thrust. In fact, on the tensioner acts a ratchet gear, that does not allow to the column to reenter during its working. With this device the tensioner automatically takes up any stretching, but operates as a fixed tensioner. This application is particularly useful for cutting out whiplashes and axial head oscillations. The M8 screw on the bottom of the cup has the function both of accomplishment of the one-directional system and to pre-load the tensioner.
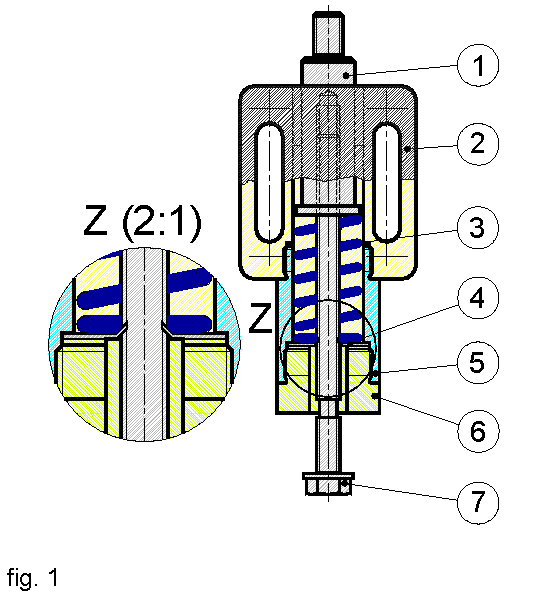
- column
- body
- spring
- spring in harmonic steel
- cylinder
- stopper
- screw M8
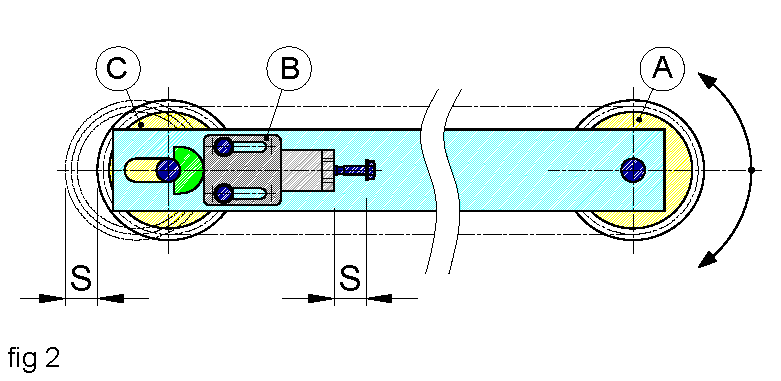
Assembling example of a one-directional TEN BLOC for the tensioning of a return shift:
A: Driving wheel
B: One directional tensioner
C: Driven wheel
S: Stroke
Load the tensioner by screwing the screw (7) until the column (1) is completely inside the body.
Position the tensioner rigidly on the plant by using M8 screws and taking advantage of the slots on body (2). The tensioner should be positioned so you can take advantage also of the stroke of the slots for a further “manual” recovery of the length of the chain (as in figure 2).
Unscrew the screw (7) for a distance equal to the wanted stroke (S), without exceed the maximum dimension indicated on the catalogue.
The screw (7) must be left in the tensioner!